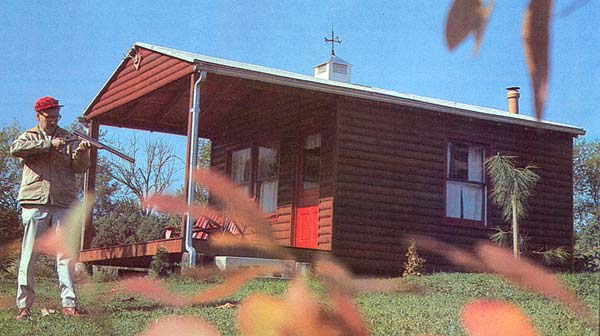
Finding a place for a workshop that's away from the house and large enough to store your tools and still leave you enough space to work can be difficult. One option would be to build a separate shop building in the back yard. Do it yourself - or with the help of a few friends - and you'll not only save thousands of dollars, you'll also have a great 14' x 16' (or 14' x 24') home shop with more than enough space to store all of your tools and build your choice of small or large projects.
The cost of this cabin is low for a couple of reasons. First, as it's designed, it rests on eight concrete piers, rather than a fully poured foundation. Plus…it contains no plumbing or heating/air-conditioning…two optional features that can be easily added for a minimal added investment.
Specifications
The overall dimensions of this cabin are 14' wide by 24' long. When erected as a cabin, this includes a single 14' x 16' room plus an 8' x 14' porch. When built as a workshop, the front porch is eliminated and incorporated into a single, large, 14' x 24' room with more than enough space to built practically any type of project you like.
The cabin's foundation (as shown) consists of eight concrete piers, supporting a large floor platform. For shop use, we recommend that the building rest on a full foundation and concrete slab at least 4" thick. However, if your local codes allow, you may be able to use the platform approach by adding another row of four piers running down the length of the cabin. This should help to provide the added support you'll need for materials, heavy workbenches and machine tools. If you decide to use this pier-supported platform approach, be sure your piers are of a large enough diameter and set far enough into the ground to meet your local building codes.
The building itself is of simple frame construction, with 2 x 4 wall studs and 2' x 6' rafters, set on 24" centers. Windows and doors can be of any size you like and framed-in wherever you want them. This frame is then covered with either shiplap or tongue-and-groove siding. This approach adds a great deal of strength to the structure and doesn't require undersheeting in most municipalities (check this first). The style of the siding shown in our example is "Log Cabin"…but you can purchase it in a wide variety of other styles to suit your tastes and budget.
Once again…before you start construction, be sure to review any deed restrictions and check the local building codes in your area. As designed, this structure should meet most codes. But in some areas, you may have to make modifications to be in strict compliance with the law.
The Foundation: Start by laying out the concrete piers. Dig each hole to an adequate depth (according to local codes) then set 8" diameter cardboard pier tubes (readily available at your local home center) into the holes to serve as forms. Adjust each tube to the exact height and fill with concrete. One 909# bag of ready mix should be enough for each pier. Once the concrete has set, peel away the cardboard tubes.
Of course, pouring a concrete slab for your cabin requires a lot more work. In fact, so much so, that we recommend having a local contractor do this job for you, should you decide to use this approach. Should you decide to do-it-yourself, here are the basic steps:
- First, remove the sod and soil to level the site and tamp the loose dirt down. Dig a trench 12" wide and 24" to 36" deep (according to code) around the cabin perimeter for use as a footer. Put up your concrete forms, then fill the entire slab area (except for the footers) with 6" of gravel. Once again, tamp down.
- Put a plastic sheet over the gravel to serve as a vapor barrier, then wire mesh over the plastic for added reinforcement .
- Pour the concrete and level it. You'll need about 8 to 9 cubic yards. Before it hardens, set 1/2" dia. x 10" long stove bolts around the perimeter to anchor your cabin frame to the slab. When you remove the forms, your finished slab should rise at least 8" above ground level .
The Floor: If you've decided to pour a slab, your floor is already finished (unless you want to add a wood or vinyl floor covering for cushioning effect. If you're using the concrete pier/floor platform approach, nail together a frame of 2 x 10's. Attach a 2 x 2 support strip along the inside of the long (24') floor frame members. Next, nail 2 x 8 planks in between on 16" centers . When the floor frame is complete, cover it with tongue-and-groove flooring. The completed floor -whether concrete or wooden - provides a good platform for studding-out the wall sections.
The Framing: Nail together each wall frame, allowing space for doors and windows where you want them. Erect the sections, nail them together at the corners, then nail, screw or bolt them to the floor. True-up the walls and attach temporary arm braces to hold them square. With the walls in place, add a 2 x 4 top plate - note that this top plate is "bird-mouthed" to tie the walls together.
With some scrap boards, suspend the ridge beam above the wall frame. Precut the rafters, then nail them to the top plate and ridge beam on 24" centers . Remove the scrap board that suspends the ridge beam and place 2 x 4 gable supports at either gable end.
Continue...
 Find
A Shopsmith Woodworking Academy Near You
