Weeken
Project
Article

SEP/OCT
2005
Volume 48/Issue 5
IN
THIS ISSUE
Project
Articles
•
The 9-Drawer Tabletop Storage Chest
• The Flying Tiger Toy Airplane
• Verticle Paper Towel Holder and Bread-Shaped
Cutting & Cheese Boards
DEPARTMENTS
•
Ask Smitty
• Owner’s Gallery
• Letters from Owners
Academy Notes
Properties
of Cabinet Lumber
Service Pointers
Bandsaw
Service Pointers
What's
New
Lift-Assist
EDUCATION
• Find
A Shopsmith Woodworking Academy Near You
•
National
Woodworking Academy in Dayton, OH
ONLINE
CATALOGS
• Online Accessory Catalog
•
Request
Printed Accessory Catalog
• Online
Replacement Parts Catalog
MARK
V INFORMATION
•
Find
A Shopsmith
MARK V Demo Near You
•
Request
MARK V Information Package
LINKS
•
Links Worth Visiting
•
Free Woodworking
Tips
FEEDBACK
Contacting
Shopsmith
Copyright
2005.
Shopsmith, Inc.
All Rights Reserved
The Flying Tigers P-40 Airplane
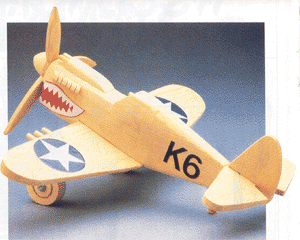
Here’s
another great Norm Marshall toy – this one commemorating the P-40,
a true WWII “ACE”
Back
in the early stages of World War II, a group of volunteer aviators made
history in the air
over China. This group…known as The Flying Tigers…became world-famous
for their victories against a superior Japanese air force.
Now, thanks to Norm Marshall, you can re-create those images of that glorious past in your own shop by making this great replica of The Flying Tigers’ legendary P-40…and you should be able to easily complete it in a single, leisurely weekend. So, let’s get started.
1: Cut all pieces to size according to the List of Materials.
NOTE: Because it can be difficult to guide a workpiece with irregular
edges accurately through a resaw cut, we suggest that you start by resawing
sufficient pieces of 1/4" and 3/8” thick stock to make all
of your thinned parts (B,C,D,F,G & H) before cutting these parts to
their final profiles.
Remember too, that it’s always best to have extra resawn stock available
in case of errors…and that it’s much safer to cut small pieces
from larger pieces of stock to help keep your hands out of harm’s
way. A little extra stock is a small price to pay for this added safety
factor !
2: Fuselage. Tilt your Bandsaw Table to 5 degrees and cut
the sides of the Fuselage (A). Tape the waste stock back onto the Fuselage
and cut out your side profiles…including the Tail and Wing notches.
Round all Fuselage edges to your liking.
3: Wing. Cut out the contour for the Wing (B), then drill the 3/16”
holes in the full 3/8” thick leading (straight/front) edge for the Guns (N).
Place the wing into position in the Fuselage notch and draw a line across
the top of the Wing surface on each side, where it meets the Fuselage.
Remove the Wing and use a conventional or Contour Sanding Drum to round the leading edge slightly and thin
the trailing edge. Be careful not to sand past your lines on the top surface
of the Wing or you’ll have unsightly gaps where these two critical
parts meet. Glue six of the Guns (N) into position.
