Major
Project
Article

SEPT/OCT
2003
Volume 46/Issue 5
IN
THIS ISSUE
Project
Articles
•
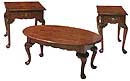
Queen Anne Living Room Tables
• Covered Wagon Toy Box
• Tilting Shelf Sewing Thread Holder
DEPARTMENTS
•
Ask Smitty
• Owner’s Gallery
• Letters from Owners
Academy Notes
Clean
Cuts - Pt. 2 - Lathe Tool Sharpening
Service Pointers
MARK
V Miter Gauge
Safety Tips
Safety First!
What's
New
42"
Filter Hood for DC3300
EDUCATION
• Find
A Shopsmith Woodworking Academy Near You
• National
Woodworking Academy in Dayton, OH
ONLINE
CATALOGS
• Online Accessory Catalog
• Request
Printed Accessory Catalog
• Online
Replacement Parts Catalog
MARK
V INFORMATION
• Find
A Shopsmith
MARK V Demo Near You
• Request
MARK V Information Package
LINKS
•
Links Worth Visiting
•
Free Woodworking
Tips
FEEDBACK
Contacting
Shopsmith
Copyright
2003.
Shopsmith, Inc.
All Rights Reserved
The Queen Anne Living Room Tables
Drawer Construction
Begin by measuring the drawer openings to double-check the drawer sizes
against the List of Materials...then cut all Drawer components to size,
as required. Plan to leave a 1/16" space on the Drawer Sides and Tops
to provide room for the Drawers to move in and out freely. Remember, the
Drawer Fronts are larger than the openings
to allow for 3/8" rabbets on the insides to recess the Fronts.
Cut the rabbets around the Drawer Fronts. Use your Jointer, Router Table Set-Up or Shaper to achieve the smoothest possible cuts.
Drilling Drawer Front
Sockets
Lay out the joinery on a piece of identically-sized scrap stock. Remember,
this piece must be EXACTLY the same thickness and width as the Drawer Fronts
(length isn't critical).
Using the Horizontal Boring set-up, use your Miter Gauge as a guide and sliding position controller. Working with a 5/8" Brad Point Drill Bit, clamp stop blocks in the Miter Gauge slots to limit the travel of the Miter Gauge when drilling the upper and lower side sockets (See Fig. 15). Use an easily-removable 1" long wooden spacer to fit between your Stop and the Miter Gauge Bar to position the center hole. All three hole positions MUST be EXACTLY symmetrical from the center of the width of the front and no more than 1/64" away from the edge of the rabbet.
 |
| Fig. 15. Set-up for drilling the Drawer Front joinery. |
Use your trial piece of stock with the joinery laid out on it to set up the stops on the exact centers and drill the 1/2" deep test sockets.
Once all is set precisely, position the Rip Fence as a back stop and set your drilling depth-of-cut to the exact thickness of the sides. Drill all sockets in the ends of the first Drawer Front (See Fig. 16). Reposition the Fence and Depth Stop accordingly and drill the Sockets in the second Front. DO NOT CHANGE THIS SET-UP...it will be used later!
 |
| Fig. 16. Drilling the Sockets in the Drawer Front ends. |
Cutting Drawer Side
Pins
Lay an end of a Front piece on a stack of corresponding Side pieces that have
been taped together in perfect alignment and hold the Front piece firmly against
the end of the taped-together sides. Align the bottom of the sides with the
bottom rabbeted edge of the Front and trace the positions of the sockets onto
the top side of the stack of Sides (See Fig 17.)
 |
| Fig. 17. Trace the sockets on the stack of Sides |
Pad saw all of the Drawer Sides to the traced sockets using your Bandsaw with a 1/8" Blade. Be sure to stay on the OUTSIDES of your lines.
View
Plans &
Assembly Drawings
Coffee
Table
•
Side View
• Side Skirt &
Tenon
• Leg
Joinery
• Table End Skirt
& Tenon
• Drop Leaf Support
• Leg Pattern
• Side
Skirt Pattern
• End Skirt Pattern
End
& Corner Table
•
Side View
• End Table Front
View
• Leg
Joinery
• Table End Skirt
& Tenon
• Rail and Pin/Tenon
• Leg Pattern
• Side
Skirt Pattern
• End Skirt
Pattern
• Drawer
Assembly
• Drawer
Joinery
• Drawer
Glide
• Drawer
Glide Assembly
•
List
of Materials
Printer Freindly PDF copy of Instructions (864K)
