Weekend
Project
Article

MAY/JUNE
2005
Volume 48/Issue 3
IN
THIS ISSUE
Project
Articles
•
The English Flip-Top Chair-Table
• The Oval Magazine Rack
• Laminated Wooden Domino Set
DEPARTMENTS
•
Ask Smitty
• Owner’s Gallery
• Letters from Owners
Academy Notes
Joinery
- Solving the Puzzle
Service Pointers
MARK
V as a Table Saw
What's
New
Lift-Assist
EDUCATION
• Find
A Shopsmith Woodworking Academy Near You
•
National
Woodworking Academy in Dayton, OH
ONLINE
CATALOGS
• Online Accessory Catalog
•
Request
Printed Accessory Catalog
• Online
Replacement Parts Catalog
MARK
V INFORMATION
•
Find
A Shopsmith
MARK V Demo Near You
•
Request
MARK V Information Package
LINKS
•
Links Worth Visiting
•
Free Woodworking
Tips
FEEDBACK
Contacting
Shopsmith
Copyright
2005.
Shopsmith, Inc.
All Rights Reserved
The Oval Magazine Rack
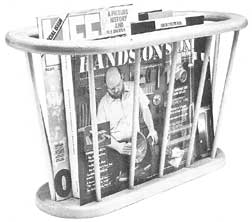
So simple, you could make four or five for different rooms - in a single weekend!
These attractive magazine racks are so simple to make that as long as you're going to make one of them, you may as well make four or five for your house...and a few more to give as gifts.
1: Prepare a 3/4" x 9-1/2" x 22" piece of stock for each rack. As you can probably see, the bottom of each rack is made from the "scrap" piece that comes from the top cut-out.
2: Use your Scroll Saw to cut the Bottom (B) from the Top (A).
3: Use a Drum Sander to smooth the inside edges of the Top (A) - and your Disc Sander to smooth the outside edges of the Bottom (B).
4: Use your Shaper set-up with a Quarter-Round Cutter - or your Router set-up with a 3/8" Round-Over Bit to round the inside edge of the Top (A).
5: Use your Bandsaw or Scroll Saw to cut the outside contour of the Top...then sand and shape this edge. Shape the outside edge of the bottom .
6: Mark all dowel hole positions on the Top and Bottom pieces. Tilt your MARK V table to 10 degrees and use a 3/8" diameter bit to bore 1/4" deep holes at your market locations for the dowels.
7: Cut all dowels to length and lightly sand the rods.
8: Assemble the rack by first gluing the dowels into the Top...then gluing them into the Bottom. Use a wood glue with an extended "open time" to avoid having to rush through the assembly process before your glue sets-up.
9: Finish sand the project and apply the finish of your choice.
