Weekend
Project
Article

MAR/APR
2004
Volume 47/Issue 2
IN
THIS ISSUE
Project
Articles
•
Strip Laminate Bending
• The Turned Hall Tree
• Two Great Kitchen Gift Items
DEPARTMENTS
•
Ask Smitty
• Owner’s Gallery
• Letters from Owners
•
New Baby Workshop Calendar
Academy Notes
Clean
Cuts - Pt. 5 - Sharpening Jointer, Molder & Shaper Knives
Service Pointers
Troubleshooting
the Shopsmith Lathe Duplicator
Safety Tips
Safety Cans for Flammable Liquids
What's
New
Check
out our New Shopsmith Website
EDUCATION
• Find
A Shopsmith Woodworking Academy Near You
•
National
Woodworking Academy in Dayton, OH
ONLINE
CATALOGS
• Online Accessory Catalog
•
Request
Printed Accessory Catalog
• Online
Replacement Parts Catalog
MARK
V INFORMATION
•
Find
A Shopsmith
MARK V Demo Near You
•
Request
MARK V Information Package
LINKS
•
Links Worth Visiting
•
Free Woodworking
Tips
FEEDBACK
Contacting
Shopsmith
Copyright
2004.
Shopsmith, Inc.
All Rights Reserved
The Turned Hall Tree
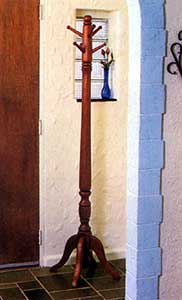
A great weekend project to help build your woodturning skills
Here's a relatively simple project that doubles in function and beauty. Build it this weekend and you'll soon have additional “closet space” - PLUS - a classic, traditionally-designed “piece of furniture” that blends well with practically any decorating scheme.
All you'll need are one 4" x 4" x 8' and one 2" x 4" x 6' pieces of lumber plus eight dowel pins and two double-ended dowel screws. That's it! We used redwood for its natural rich color and ease of turning....but any soft, easily-turned hardwood will work equally well.
First, decide on your design. Ours is pretty traditional and you should have little difficulty duplicating it by following the drawing. You could try a straight tapered pencil-post design with a Shaker flair...or a more contemporary design. The choice is yours.
Start the building process by cutting your 4" x 4" stock to length, being sure to allow an extra 1/2" on each end. Separately turn and finish sand (while on the lathe), each of the three main spindle parts (A, B, and C).
Next, resaw some 4" x 4" scrap into1-1/8" square pieces 12" long for the six coat pegs (E). These can be most efficiently turned end-to-end, two at a time, from a single length of stock.
TIP: For added efficiency and a dead-on match, use Shopsmith's Lathe Duplicator.
Now, lay out the legs (D) on your 2" x 4" stock.. Start by cutting the angle for the leg tops. Drill the 3/8" dowel peg holes using the MARK V's Horizontal Boring Mode. Be sure to set up some stops so all (8) holes are drilled in the exact same relative position.
Use your Bandsaw to cut out your four legs. At this point, you can either round-over all leg edges using your Belt Sander or an inflatable, Contour Sanding Drum ...or you can create more intricately shaped edges using a Router set-up, or a Shaper and the cutter profiles of your choice.
Next, set up your MARK V in Drill Press mode and bore the (8) 3/8" holes in the Bottom Spindle (C) for the Leg dowel pegs. Be sure to measure and mark the positions of these holes accurately, so they line up precisely with the mating holes in each Leg end.
The tapered Top Spindle (A) has six equally positioned holes that divide the spindle into three equal sections. Here's how to do this: Wrap a piece of paper around the turned Spindle (A) and mark the diameter of the Top. Flatten the paper out, measure the diameter and divide it into three equal sections. Transfer these marks onto your turned Spindle.
