Major
Project
Article

MAR/APR
2004
Volume 47/Issue 2
IN
THIS ISSUE
Project
Articles
•
Strip Laminate Bending
• The Turned Hall Tree
• Two Great Kitchen Gift Items
DEPARTMENTS
•
Ask Smitty
• Owner’s Gallery
• Letters from Owners
•
New Baby Workshop Calendar
Academy Notes
Clean
Cuts - Pt. 5- Sharpening Jointer, Molder & Shaper Knives
Service Pointers
Troubleshooting
the Shopsmith Lathe Duplicator
Safety Tips
Safety Cans for Flammable Liquids
What's
New
Check
out our New Shopsmith Website
EDUCATION
• Find
A Shopsmith Woodworking Academy Near You
•
National
Woodworking Academy in Dayton, OH
ONLINE
CATALOGS
• Online Accessory Catalog
•
Request
Printed Accessory Catalog
• Online
Replacement Parts Catalog
MARK
V INFORMATION
•
Find
A Shopsmith
MARK V Demo Near You
•
Request
MARK V Information Package
LINKS
•
Links Worth Visiting
•
Free Woodworking
Tips
FEEDBACK
Contacting
Shopsmith
Copyright
2004.
Shopsmith, Inc.
All Rights Reserved
Strip Laminate Bending

On a workbench or table, position the strips (in order) next to the form. Arrange your clamps nearby in an orderly fashion so you can access them quickly at the appropriate time. For Single-Form bends, an extra strip, waxed on both sides, is set aside. This piece will go between he clamps and the strips to serve as a “caul” to prevent the clamps from marring your finished piece.
If your project only has a few layers, glue bottles and spreading sticks make adequate spreaders. If you'll be laminating many strips, use paint rollers and pans to speed the process...or use an extended open time glue. Gluing laminated strips together is a very messy job...so be sure to have lots of water-soaked rags and special solvents (in the case of some glues) handy for clean-up.
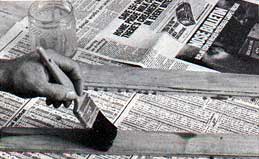 |
|
Fig. 6. Apply glue to both sides of the inside strips and to only one side of each outside strip. An assistant is an invaluable aid during the glue-up process. |
Start by flipping the top strip over and laying it on your work surface next to the stack. Apply glue to this strip and to the next strip on the top of the stack (See Fig. 6). It's important to note that applying glue to both sides of the laminate strips helps ensure a good glue bond.
After applying glue to just one side of the bottom strip, place the waxed strip on top of the stack, then align the stack by picking it up and placing it on its edge.
Next, place the stack on the form with the waxed strip toward the outside. To properly locate the stack, lightly clamp the bend in several places. Once you have the stack located evenly on the form, start applying final clamping pressure at the center of the bend. Working from this center outward in both directions, evenly apply clamping pressure on all clamps from end-to-end, being careful not to over-tighten the clamps. Following this procedure will reduce the possibilities of glue voids or pockets.
Allow the bend to remain clamped in the form until the glue has dried thoroughly.
Tip: For best results during glue-up, get a helper. The extra hands make the glue-up procedure less hectic and much more enjoyable.
Step 7: Bend Preparation
After the glue has dried, lift the bend off the form. The bend will stabilize
after it's thoroughly dry...but excess glue on the surface will slow that
drying time. Since some glues can be extremely difficult to remove when
dried, you may have to use a grinder, cabinet scraper, rasp or belt sander
to eliminate the excess.
Step 8: Using
The Bend
Machine and finish a laminated bend just as you would solid wood. Stretching
and compression forces are concentrated, however, in the outer layers.
Cutting all the way across these layers will weaken the bend and may cause
de-lamination. Therefore, when cutting mortises or drilling holes on the
surface of the bend, do not cut or drill across the entire width of the
bend.
