Major
Project
Article

| Jan/Feb
2007 Volume 3 of 4 Volume One - Planning a Workshop Volume Two - Workshop Safety Archives |
IN
THIS ISSUE |
| Workshop Articles |
| EDUCATION |
 Find
A Shopsmith Woodworking Academy Near You |
 National
Woodworking Academy in Dayton, OH |
| Coming Your Way |
| Shopsmith Traveling Academy |
| See a MARK V Demonstration |
| ONLINE CATALOGS |
|
Online Accessory Catalog |
|
Request
Printed Accessory Catalog |
| LINKS |
|
Links
Worth Visiting |
|
Free
Woodworking Tips |
| FEEDBACK |
| Contacting Shopsmith |
Copyright
2007 Shopsmith, Inc. All Rights Reserved |
|
|
THE
PERFECT TOOLBOX FOR SMALL TOOLS
An heirloom-quality, 9-drawer toolbox
you build yourself
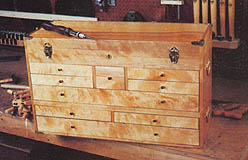
Nine drawers of storage in this 2-piece toolbox give you a place for everything
This workshop toolbox features a total of nine drawers to hold all types of hand tools and small accessories for your MARK V and portable electric tools. It's made in two sections...a top with a large upper compartment and six drawers, and a base with three drawers. Since it's a two-part project, you can either make the entire tool box all at once, or you can split the job into two sessions, building part now and part later.
We built our box out of solid birch and birch plywood. We used poplar for the drawer sides and backs and 1/8" pegboard for the drawer bottoms.
Step 1:
If you have a thickness planer, start by gluing up a 12-1/2" wide
by 42" long piece of stock for the box sides (A)
and base sides (N). The extra
width and length will give you enough stock to allow for your saw kerfs
and for squaring-up your planed stock. Once the glue has dried, use a
hand scraper
or bench chisel to carefully remove any glue squeeze-out before planing
the stock to its desired 1/2" thickness. Next, rip your stock to the final
12" width, then crosscut the pieces (A
& N) to 12-3/16" and 6-1/16" (1/16"
longer than their indicated finished lengths).
If you don't have a thickness planer, start by resawing your narrow pieces of stock to 9/16" thick. If you have a jointer, rip them to a dimension that's narrower than your jointer blades are wide, then make two 1/64" passes across each face, bringing the individual pieces to the desired 1/2" thickness. Next, rip the edges of your stock parallel, joint them on your jointer and glue them up to the 42" x 12-1/2" size, as described above. Use a belt sander to carefully sand off any imperfections where the boards are joined. Next, rip your stock to the final 12" width, then crosscut the pieces (A & N) to 12-3/16" and 6-1/16" (1/16" longer than their indicated finished lengths).
Follow the same procedures outlined above to prepare the remaining pieces of thinned-down hardwood and poplar for the project, bringing each to the desired thickness.