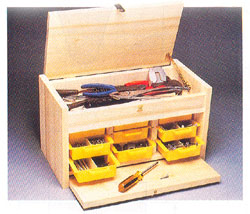
You
can never have too much organized storage space for your “stuff”…whatever
that may be.
And, whether you’re planning to store tools, craft supplies, collectibles
or other personal “treasures”, this Chest could be just what
you’ve been looking for…for three great reasons.
First, it’s easy to build.
No fancy cuts or complicated joinery here. Made entirely of straight cuts
plus a few dadoes and rabbets, everything butts together, providing an
excellent exercise in the importance of making accurate cuts.
Secondly, this project goes
together FAST. Simple joinery and ready-made plastic drawers (we’ll
tell you where to get them) cut your production times way down so even
a beginning woodworker should be able to build this project in a single
weekend.
And finally, the top compartment is lockable so, you’ll be able
to protect your valuable “stuff” from prying eyes and little
hands.
We built ours from poplar,
but you could just as easily make it from any hardwood…or even veneered
plywoods, if you like. If you choose the latter, your dimensions will,
of course, have to be adjusted to accommodate solid hardwood edge banding
or veneer-type edging tapes.
The drawers are available from
Baumbach Engineering out of Mountain View, CA. on-line at www.DandyDrawers.com...or
by phone (650-968-0898). Choose from bright red, light blue, light green,
yellow or white. Our plans call for their 8” sized drawers (10”
& 12” models are also offered), which are available in 6-packs
(all same color) for $9.50…or 12-packs for $16.50. Drawer dividers
are also available.
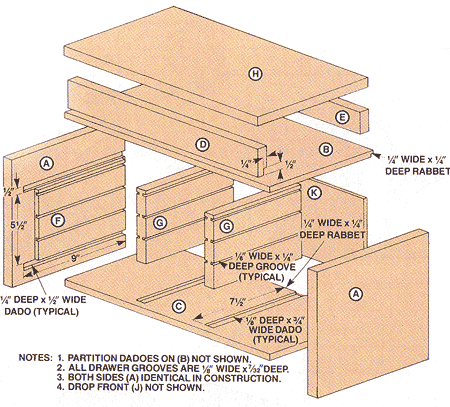
1: Cut parts A,
B, C, D, E, F & G to size, according to the List of Materials.
2: Next, lay out and
use your Dado Blade or Router Package
to cut the 1/2" wide stop dadoes in the sides
(A) for the Compartment Bottom
(B) and Chest Bottom (C).
Square the dado ends with a chisel.
3: Adjust your Dado
Blade (or change Router Bits) to form the 3/4" wide stop dadoes in
the Bottoms (B & C),
that will hold the two Drawer Partitions (G).
Square the dado ends with a chisel.
4: Again, using your
Dado Blade or Router, cut the 1/4" x 1/4" rabbets in the Bottoms
(B & C) for the Back
(K).
5: Lay out the grooves
for the Drawers on the Partitions (G)
and Supports (F),
then use any 1/8” kerf Carbide-Tipped Saw Blade or 1/8” Router
Bit (either, set at a 7/32” depth-of-cut) to cut the grooves in
these parts F & G).
6: Dry assemble parts
A, B, C and G together
to form the outer Chest case, check carefully for squareness and clamp
temporarily. Use Double Stick Tape
or clamps to hold the two Drawer Supports (F)
in position while you double-check the fit of the Drawers into their grooves.
If the Drawers fit too tightly, adjust your Saw Blade’s depth-of-cut
(used in Step 5 above) accordingly and deepen the grooves slightly.
Test the fit again and repeat the process, if required.
7: Use 1/2" to
3/4" long brads and glue to attach the Drawer Supports (F)
to the Sides (A).
8: Assemble, glue
and clamp parts A, B, C and
G together to form the outer Chest case.. Check carefully
for squareness and set aside to dry.
9: Cut the two rails
(D & E) to final length. Glue
and clamp them into position. For added
durability, all joints can be reinforced with #6 or #8 x 1-1/4”
flathead wood screws, if you
prefer.
10: Attach the Back
(K) with small
brads or 2d nails.
11: Drill the required
mounting hole in the bottom of the Front Rail
(D) for your Bullet Catch Receiver. Be sure it is centered,
and that it will line up with the Bullet Catch you will be installing
in step #12, below.
12: Cut the Lid
(H) and Drop Front (J)
to length. Drill the hole for your Bullet Catch in the top edge of the
Drop Front, being certain it aligns properly with the Bullet Catch Receiver
in the bottom of the Front Rail (D).
Attach each to the chest with 1-1/2” x 1” Butt Hinges.
13: Apply the finish
of your choice.
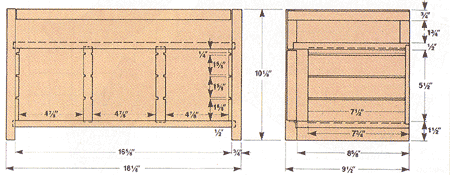
List of Materials
(finished dimensions in inches)
A: Sides (2) 3/4 x
9-1/2 x 10-1/8
B: Compartment Bottom 1/2 x 8-15/16 x 17-1/8
C: Bottom 1/2 x 8-11/16 x 17-1/8
D: Front Rail 3/4 x 2-1/4 x 16-5/8
E: Back Rail 3/4 x 1-3/4 x 16-5/8
F: Drawer Supports (2) 1/4 x 5-1/2 x 7-1/2
G: Drawer Partitions (2) 3/4 x 7-1/2 x 5-3/4
H: Lid 3/4 x 9-1/2 x 16-5/8
J: Drop Front 3/4 x 6 x 16-5/8
K: Back 1/4 x 6 x 16-5/8
HARDWARE:
¨ 1-1/2” x 1” Butt Hinges (4)
¨ #6 (or #8) x 1-1/4” flathead Wood Screws (optional)
¨ 1/2" to 3/4" long Brads
¨ 5/8” Dia. Brass Knob (for drop-down Front)
¨ Brass Bullet Catch (for Front)
¨ Friction lid Support
¨ Brass Hasp
¨ Dandy-8 Organizer Drawers (9) (see article for ordering information)
|
 Find
A Shopsmith Woodworking Academy Near You