Money
Maker
Article

SEPT/OCT
2004
Volume 47/Issue 5
IN
THIS ISSUE
Project
Articles
•
Living Room Sofa Table
• Nob Hill Cable Car
• Two-Shelf Telephone Stand/Side Table
DEPARTMENTS
•
Ask Smitty
• Owner’s Gallery
• Letters from Owners
•
New Baby Workshop Calendar
Academy Notes
Hardwood
Information You Should Know - Pt 2
Service Pointers
Disc
Sander
Woodworking
Technologies
Stepped
Dowels
Safety
Safety Lessons I've Learned
What's
New
Referral
Rewards Program
EDUCATION
• Find
A Shopsmith Woodworking Academy Near You
•
National
Woodworking Academy in Dayton, OH
ONLINE
CATALOGS
• Online Accessory Catalog
•
Request
Printed Accessory Catalog
• Online
Replacement Parts Catalog
MARK
V INFORMATION
•
Find
A Shopsmith
MARK V Demo Near You
•
Request
MARK V Information Package
LINKS
•
Links Worth Visiting
•
Free Woodworking
Tips
FEEDBACK
Contacting
Shopsmith
Copyright
2004.
Shopsmith, Inc.
All Rights Reserved
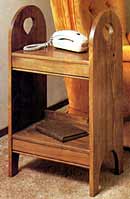
The Two-Shelf Telephone Stand/Side Table
1. Cut all stock to size, according to the Bill of Materials.
2. Use your MARK V Router Package or a Router Table with a 3/8" Dovetail Bit to cut the four 3/8" stopped dovetail grooves (11-3/8" long) in Sides (A) as shown in Fig. 1. Be sure to start both dovetail grooves at the rear of the Sides (A).
3. Cut the matching four dovetails on the ends of the Shelves (B) as shown in Fig. 2.
4. Using a Router set-up with a 3/8" Round-Over Bit, round over the front edges of the Shelves (B).
5. Using your Bandsaw or Scroll Saw, round off the tops of the Sides (A) and cut out the openings at the bottoms (that form the legs). Use Your Drum Sander to smooth the inside edges.
6. Drill starter holes in Sides (A) at their tops where the decorative areas are to be cut out (See Fig. 1). Use your Scroll saw to cut out the openings.
7. Cut the decorative edge on the fronts of the Shelf Facings (C). We used a Shaper Set-up with a Bead & Bevel Cutter (See Fig. 3).
8. Assemble the Shelves (B) to the Sides (A) using the dovetails, glue and some clamps. Wipe away any excess glue immediately with a damp cloth.
9. Install the Shelf Facings (C) and the Bottom Shelf Back (D) with glue and clamps. NOTE: The two Shelf Facings (C) should be attached flush with the fronts of the Shelves (B).
10. Finish with a stain of your choice.
Suggested retail price: $25 to $80 each, depending on woods used, design and finish.
View Plans &
Assembly Drawings
•
Figure 1
• Figure 2
• Figure 3
• Assembly
Printer Friendly PDF copy of Instructions (794K)
