Major
Project
Article

SEPT/OCT
2003
Volume 46/Issue 5
IN
THIS ISSUE
Project
Articles
•
Queen Anne Living Room Tables
• Covered Wagon Toy Box
• Tilting Shelf Sewing Thread Holder
DEPARTMENTS
•
Ask Smitty
• Owner’s Gallery
• Letters from Owners
Academy Notes
Clean
Cuts - Pt. 2 - Lathe Tool Sharpening
Service Pointers
MARK
V Miter Gauge
Safety Tips
Safety First!
What's
New
42"
Filter Hood for DC3300
EDUCATION
• Find
A Shopsmith Woodworking Academy Near You
• National
Woodworking Academy in Dayton, OH
ONLINE
CATALOGS
• Online Accessory Catalog
• Request
Printed Accessory Catalog
• Online
Replacement Parts Catalog
MARK
V INFORMATION
• Find
A Shopsmith
MARK V Demo Near You
• Request
MARK V Information Package
LINKS
•
Links Worth Visiting
•
Free Woodworking
Tips
FEEDBACK
Contacting
Shopsmith
Copyright
2003.
Shopsmith, Inc.
All Rights Reserved
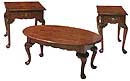
The Queen Anne Living Room Tables
Making the tops
Saw, joint and glue-up the stock for the three Top pieces. Use a Hand
Scraper to scrape away the excess glue and plane and/or sand the pieces
smooth. Cut the Top pieces to size according to the List
of Materials.
Use the Shaper set-up with a Drop-Leaf Cove Cutter and Drop Leaf Bead Cutter to cut the rule joints on the edges where the Center Top piece and Drop Leaf side pieces of the Coffee Table meet.
While you have your Shaper set up, change to a 1/4" Quarter-Round Cutter and round-over the top edges of the Drawer Sides. Switch to the Bead & Quarter-Round Cutter and cut the decorative thumbnail edges around the Drawer Fronts.
Next, clamp the three Coffee Table top parts gently together while you lay out the Top profile. Since each drop-leaf joint will overlap by about 3/8", the finished size of the Top will be 30" x 40".
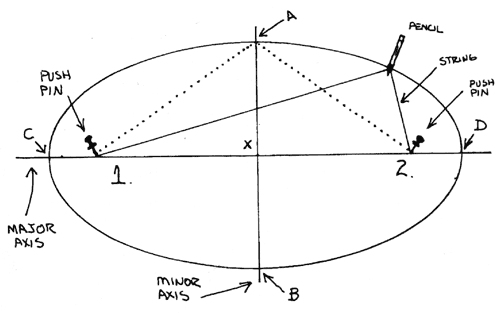
Turn your Table over and draw your oval layout on the underside. Begin by drawing perpendicular horizontal and vertical centerlines for your oval as shown in Fig. 19-A. These lines will be your minor (A/B) and major (C/D) axes.
 |
| Fig. 19-A. Click on image for larger view. Click here for Printer friendly version. |
Set a large compass to the distance CX (in our case, this should be half the width of our Table Top or 20"). Position the compass point at location A and strike an arc across the major axis line at points #1 and #2.
Take a long piece of string or heavy thread and tie it intoa continuous loop that will be equal to the distance between points "C" and "2", when the loop is pulled taut (In other words, if your push pins were inside your tied loop at points "C" and "2", the loop would be taut.)
Drive your two push pins lightly into the underside of the Top at points #1 and #2 on your layout. Slip your tied loop over the outside of you push pins. Position the point of a pencil or marker inside your string loop at location "A" and begin moving you pencil or marker point around the layout in a clockwise manner...dragging the string loop with you as you finish drawing your oval.
Mortise and mount the drop-leaf hinges to the underside of the Top. Note the relationship of the hinge pin in the joint (See Fig. 20). Remove the clamps.
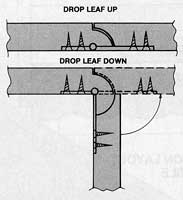 |
| Fig. 20. Hinge pin-to-rule joint relationship |
Use your Bandsaw to cut the oval profile, then carefully sand the edges smooth using your Disc Sander. Next, use a Guide Pin Shaper set-up with an Ogee Cutter and Rub Collar to cut the decorative edge around the assembled oval Coffee Table Top. This set-up will allow the Shaper to cut into the Top slightly beyond what the plans call for. Sand away this unwanted ridge around the edge with your Disc Sander.
Drill the Top retainer screw holes on the underside of the table Tops, 1-1/2" away from the Leg Post positions.
Assemble the Drawers with glue, 1" long Drawer dowels and bar clamps. Wipe the glue squeeze-out from the wood with a water-soaked rag.
Sand, sand, sand and sand some more...then apply the finish of your choice.
View
Plans &
Assembly Drawings
Coffee
Table
•
Side View
• Side Skirt &
Tenon
• Leg
Joinery
• Table End Skirt
& Tenon
• Drop Leaf Support
• Leg Pattern
• Side
Skirt Pattern
• End Skirt Pattern
End
& Corner Table
•
Side View
• End Table Front
View
• Leg
Joinery
• Table End Skirt
& Tenon
• Rail and Pin/Tenon
• Leg Pattern
• Side
Skirt Pattern
• End Skirt
Pattern
• Drawer
Assembly
• Drawer
Joinery
• Drawer
Glide
• Drawer
Glide Assembly
•
List
of Materials
Printer Freindly PDF copy of Instructions (864K)
