Major
Project
Article

JAN/FEB
2002
Volume 45/Issue 1
IN THIS ISSUE
Project
Articles
•
9-Drawer Workshop Toolbox
• Child's Desk and Chairs
• Candle Sconce and Desktop Pencil Holder
DEPARTMENTS
•
Ask Smitty
• Owner’s Gallery
• Letters from Owners
Academy Notes
Finishing
Touches - Pt.3 Applying a Natural Finish
Service Pointers
Speed
Changer
Safety Tips
Safety
Is
Your Decision
What's
New
The
Standard Anniversary Model Shopsmith MARK V
EDUCATION
• Find
A Shopsmith Woodworking Academy Near You
• National
Woodworking Academy in Dayton, OH
ONLINE
CATALOGS
• Online Accessory Catalog
• Request
Printed Accessory Catalog
• Online
Replacement Parts Catalog
MARK
V INFORMATION
• Find
A Shopsmith
MARK V Demo Near You
• Request
MARK V Information Package
LINKS
•
Links Worth Visiting
•
Free Woodworking
Tips
FEEDBACK
Contacting
Shopsmith
Copyright
2002.
Shopsmith, Inc.
All Rights Reserved
The Workshop Toolbox
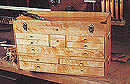
Step 19: Mount the hardware. Clamp the top lid to the box and attach the hinges and latches.
Drop the 3/16" steel rods into the locking holes until they bottom out into the shallow holes in the bottom front trim piece (P). Mark them at about 1/2" to 9/16" above the top of the front face (B). Remove the rods and place the marked ends in a metal-jawed vise with the marks flush with the top of the vise jaws . Head the rod ends with a propane torch to soften them and bend the ends over to a 90-degree angle, forming a short "L" on the end of each rod.
Using a small chisel or rat-tail rasp, cut a 1/4" to 3/8" deep by 1/4" wide notch on the INSIDE (or back side) only of the front face (B). The "L" ends of the rods will slip into these notches when they're dropped into the locking holes -- then the box lid will be shut and locked, holding the locking rods down, locking all drawers shut. It's important that these notches NOT be cut through the front of the front face (B).
Step 20: Final touches. Remove all hardware and finish sand the project inside and out. Apply the finish of your choice and enjoy.
View
Plans &
Assembly Drawings
Final
Assembly
Front Layout
Box Side Layout
Partition Assembly
Base Side Layout
Box to Base Connection
Drawer Construction
Drawer Partition Layout
List
of Materials
Printer Freindly PDF copy of Instructions
